How to list your beauty and wellness business.

Attract new customers and expand your reach in no time! All you need to do is follow the steps below to create your business in our easy-to-use directory listing platform and you’ll be ready to go. With Spadweller Directory, taking your business to the next level couldn’t be simpler or quicker!

Make sure to get noticed by all the right people. Get listed today. Free for starters.

Is your business already listed?

Your business may already be listed on our directory. Before you create a new listing, ensure you are not already listed. Check below by entering your business name first.


How to Check if Your Business is Listed:


1. Enter Your Business Name: Type the name of your business in the search bar provided.

2. Search: Click on the search button to find matching listings.

3. Review Results: Check the search results to see if your business is already listed.

4. Verify Listing: If your business appears in the search results, click on it to verify the listing details.

5. Update or Create New Listing: If your business is not listed or if you need to update an existing listing, proceed to create or edit your listing accordingly.


By following these steps, you can ensure that you’re not duplicating listings and maintain the accuracy of our directory.

Create new listing:

Follow the steps below to create your listing in Places.

1. In the Main Header, select “+ Add Listing“.  The dropdown menu shows, then select “Add in Places”.

2. Optional: Import details from Facebook page, TripAdvisor URL.


3. Complete the required and optional fields:

4. Package: Enter your package choice here.

Note: The first 100 Listings in Places will receive a free one year subscription. To do so, please choose “Place Listing Premium Plan”. You won’t be charged until the one year period is ended.

5. Has Franchise: Choose yes or no.

If yes:

Lock Franchise fields: Choose the fields you don’t want others to change.

Mark if you are the business owner/associate claiming the listing.

6. Place Title: Enter your business name.

Upload logo.

7. Description: Enter a description for the listing.

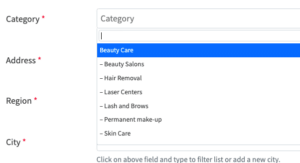
8. Category: Select a category for your listing. Multiple categories can be set with select plans. When more than one categories are selected, a default can also be selected. The default category can be used for the URL slug and determines the default map icon used.

shows the section how to select category

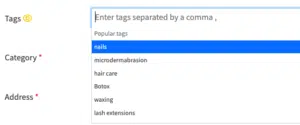
9. Tags: Select tags for your listing. Choose from dropdown list or add your own tags. Multiple tags can be set with select plans.

shows section how to add tags

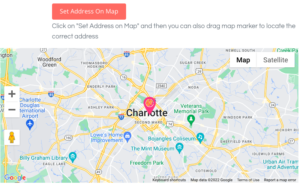
10. Address: There are several convenient ways to set the address for a listing.

Doing one of the following will auto-set the correct info for all the address fields.

  • Drag the map to the desired position. 
  • Drag the map marker to the desired position.
  • Enter the address and then click Set Address on map. This will try to set the correct map position.
  • Clicking the My Location icon in the street address field will work if you are currently at the location you wish to add. 

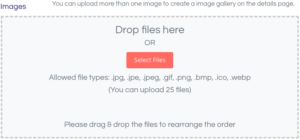
11. Images – Although not a required field, there are some points to mention.

  • The first image added will be used as the featured image.
  • Image title and caption can be set for better SEO & accessibility performance.
  • Images can be dragged and dropped to set the order required.
  • If no image is set, then  default fallback images are set.

12. Add Phone, Email, Website.

13. Add Social media links.

14. Add Video.

15. Premium Listings are marked featured listings.

16. Add business hours.

17. Add Link Posts events or Link Posts to Special Offer when you have listings in this link.

18. Click Submit Listing – By default this will:

    • Place the listing in “Pending Review” status.
    • Email the admin that a listing needs to be reviewed.
    • Email the user their listing has been submitted for approval.
    • A separate user email is sent when the email is approved.

19. You will be redirected to Billing Information.

20. Enter Billing Email Address, First Name, Last Name, Address, City, State, Zip Code, Country, Phone, Company.

21. If you have a coupon code, you can enter it here. (First 100 Places listings are automatically 100% discounted).

22. Billing Item is in the shopping cart.

23. In addition, you can choose to add a subscription plan for listing events. You’ll have a choice of 3 plans: Starter Plan, Pro Plan and Premium Plan. If you are not sure which plan to choose or if any, you can always start with the free Starter Plan as this allows you to list one event at a time. To learn more about Events and plans, check out the section in the hub page.

24. Select Payment Method: PayPal, Stripe, Credit Card.

Ready to list?

Click the link below to create your listing. Do you have any questions for us or encounter some issues? Click the Chat bubble on the bottom right for live response. 

Spadweller
Logo
Skip to content
Shopping cart